Half-Square Triangles: 1, 2, 4 or 8 at a Time?
A practical guide to sizing, fabric waste, bias edges and what happens to directional prints — so you can pick the right method for the quilt you’re actually making.
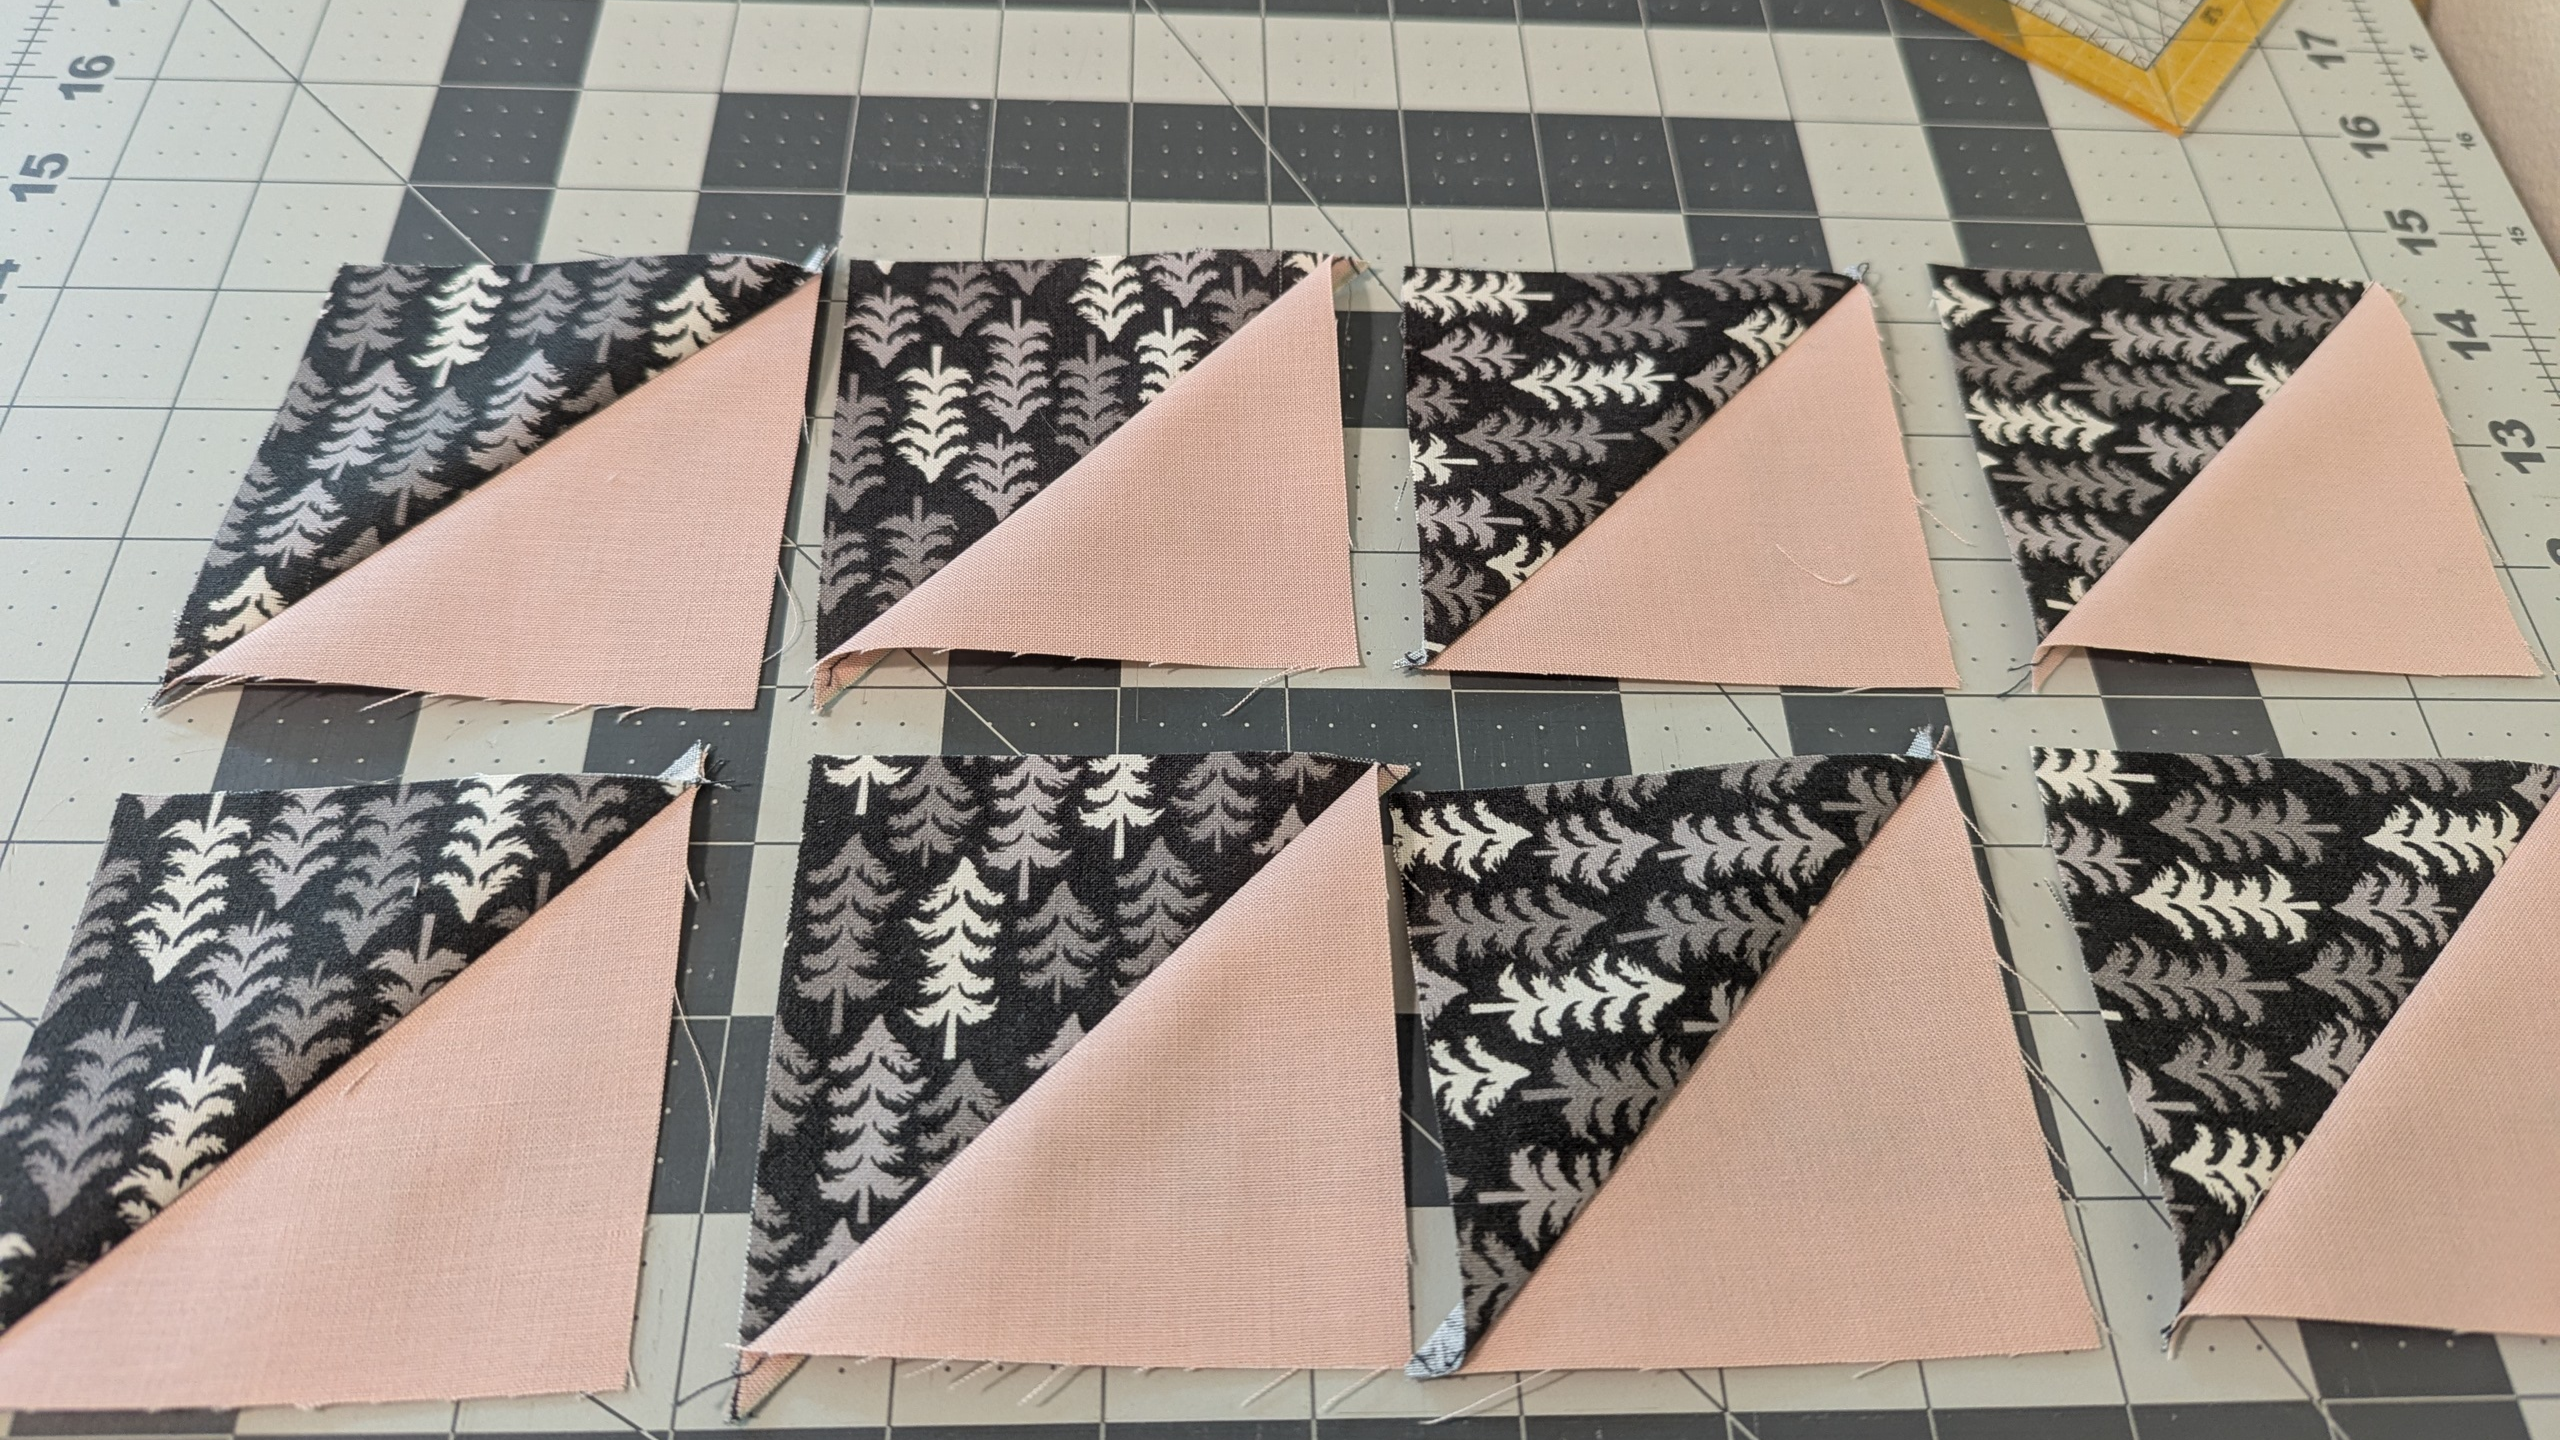
There Is No Single Best HST Method
So many beautiful designs come from the humble half-square triangle. The finished block can look identical no matter which method you use, but the construction method changes how many units you make at once, how much fabric you use, how easy the unit is to keep square, and — if your fabric has a clear “up” — where that print ends up pointing.
The useful question isn’t which method is best — it’s which method is best for this quilt, this fabric and this number of HSTs. PatchOwl Quilt Design Software reviews your design and, if it contains HSTs, uses the factors below to recommend one.
Choose Your HST Method By What Matters Most
| Method | Best when… | Fabric waste | Directional fabric | Exposed bias outer edges | Inaccuracy risk |
|---|---|---|---|---|---|
| 1 at a time | You need exact placement or only a few HSTs | High | Excellent control | No | Lowest |
| 2 at a time | You want the best all-purpose method | Low | Limited — paired units point opposite ways | No | Low — keep markings accurate and use a scant seam |
| 4 at a time | You need four matching HSTs quickly | Low | Rotates through diagonal orientations | Yes | High — bias edges stretch easily; cutting errors can’t be absorbed by a seam |
| 8 at a time | You need many HSTs from the same two fabrics | Low | Rotates through four orientations | No | Medium — large starting squares make cutting errors harder to absorb |
HST Sizing: Finished, Unfinished and Starting Square Size
The finished HST size is what’s visible after the unit is sewn into the quilt. The unfinished (trim-to) size is ½ in larger, since it still includes a ¼ in seam allowance on every side.
Example: A 3 in finished HST should measure 3½ in unfinished before it’s sewn into the quilt.
The chart below shows cutting sizes for a given finished HST size, by method. Sizes are the minimum geometric cutting size, rounded up to the nearest ⅛ in, and don’t include extra allowance for trimming. If you want that margin, cut a little larger and trim down once the HST is complete — see “Should I oversize HSTs and trim them?” in the FAQ below.
| Finished HST | 1 at a time: cut 2 | 2 at a time: cut 2 | 4 at a time: cut 2 | 8 at a time: cut 2 |
|---|---|---|---|---|
| 1 1/2 in | 2 in | 2 3/8 in | 3 3/8 in | 4 3/4 in |
| 2 in | 2 1/2 in | 2 7/8 in | 4 1/8 in | 5 3/4 in |
| 2 1/2 in | 3 in | 3 3/8 in | 4 3/4 in | 6 3/4 in |
| 3 in | 3 1/2 in | 3 7/8 in | 5 1/2 in | 7 3/4 in |
| 3 1/2 in | 4 in | 4 3/8 in | 6 1/4 in | 8 3/4 in |
| 4 in | 4 1/2 in | 4 7/8 in | 6 7/8 in | 9 3/4 in |
| 4 1/2 in | 5 in | 5 3/8 in | 7 5/8 in | 10 3/4 in |
| 5 in | 5 1/2 in | 5 7/8 in | 8 3/8 in | 11 3/4 in |
| 5 1/2 in | 6 in | 6 3/8 in | 9 in | 12 3/4 in |
| 6 in | 6 1/2 in | 6 7/8 in | 9 3/4 in | 13 3/4 in |
1-at-a-Time HSTs: Maximum Control, Maximum Waste
The 1-at-a-time method gives you the most direct control over which fabric lands in each triangle — and which way a directional print points.
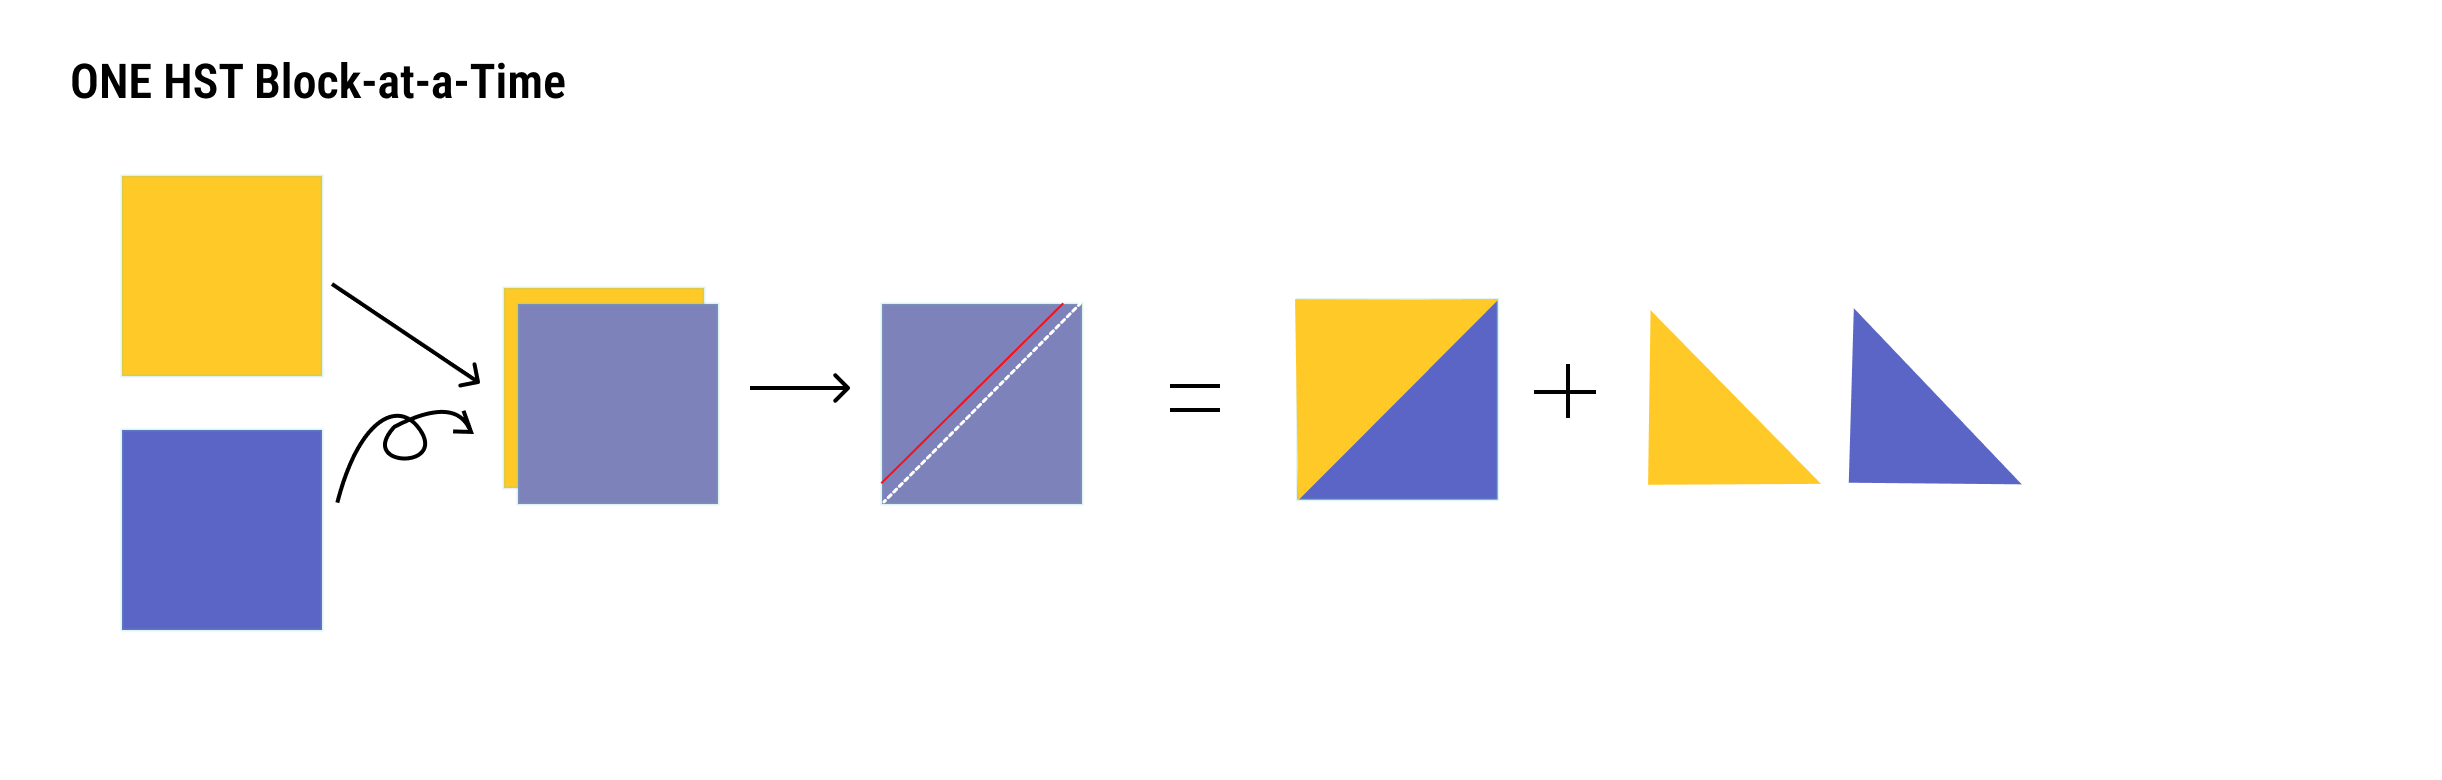
- 1Place fabric right sides together.
- 2Sew diagonally. Cut ¼ in from the stitching line.
- 3Open and press (final block = starting square size).
- 4Creates 2 waste triangles (too small to make another block of the same size).
- Best for: small quantities, precise motif placement, fussy cutting, and cases where the HST must stay exactly the size of the starting square.
- Fabric use: the highest waste of the four methods — the cut-away triangles are too small to reuse.
- Bias edges: none around the outside of the finished HST.
- Directionality: the best control of the four methods, since every unit is made individually.
Choose this method when: “I need this tree, stripe, word or motif pointing this way.”
Sizing math: finished size + ½ in. Always use a scant seam allowance.
2-at-a-Time HSTs: the Dependable All-Purpose Method
For many quilts, 2-at-a-time is the sweet spot: efficient, easy to understand, no exposed bias edges, and it produces pairs of HSTs from the same two fabrics.
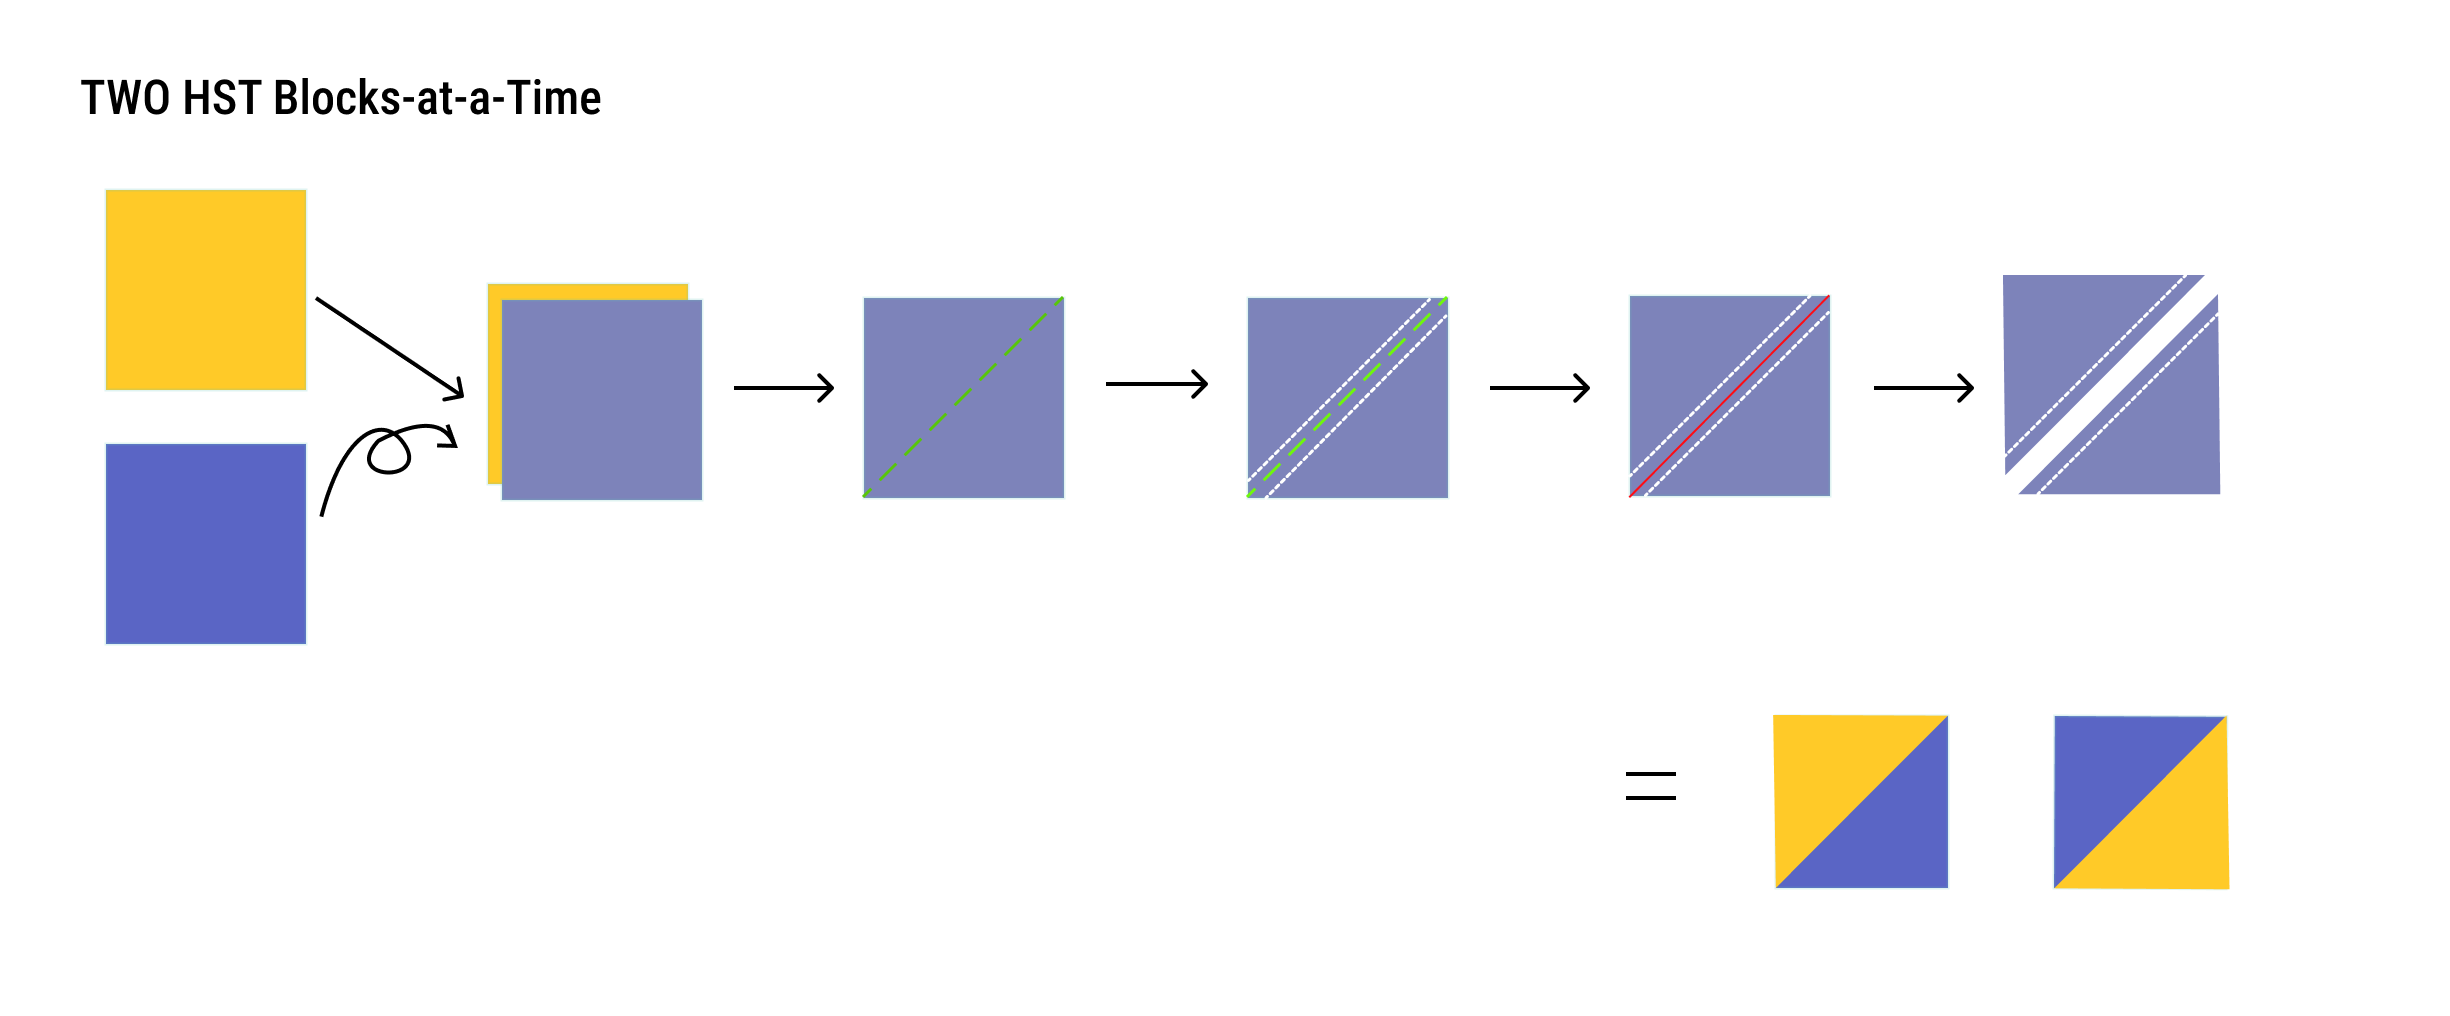
- 1Place fabric right sides together.
- 2Draw a diagonal line.
- 3Sew on either side of the line with a scant ¼ in seam allowance.
- 4Cut along the diagonal line.
- 5Open and press.
- Best for: most general HST piecing, scrappy quilts, matched pairs, and quilters who want low waste without a large starting square.
- Fabric use: low waste.
- Bias edges: none around the outside of the finished HST.
- Directionality: the two HSTs don’t preserve the print in the same orientation — if the same directional fabric sits in the same corner of both squares, the paired units point in opposite directions.
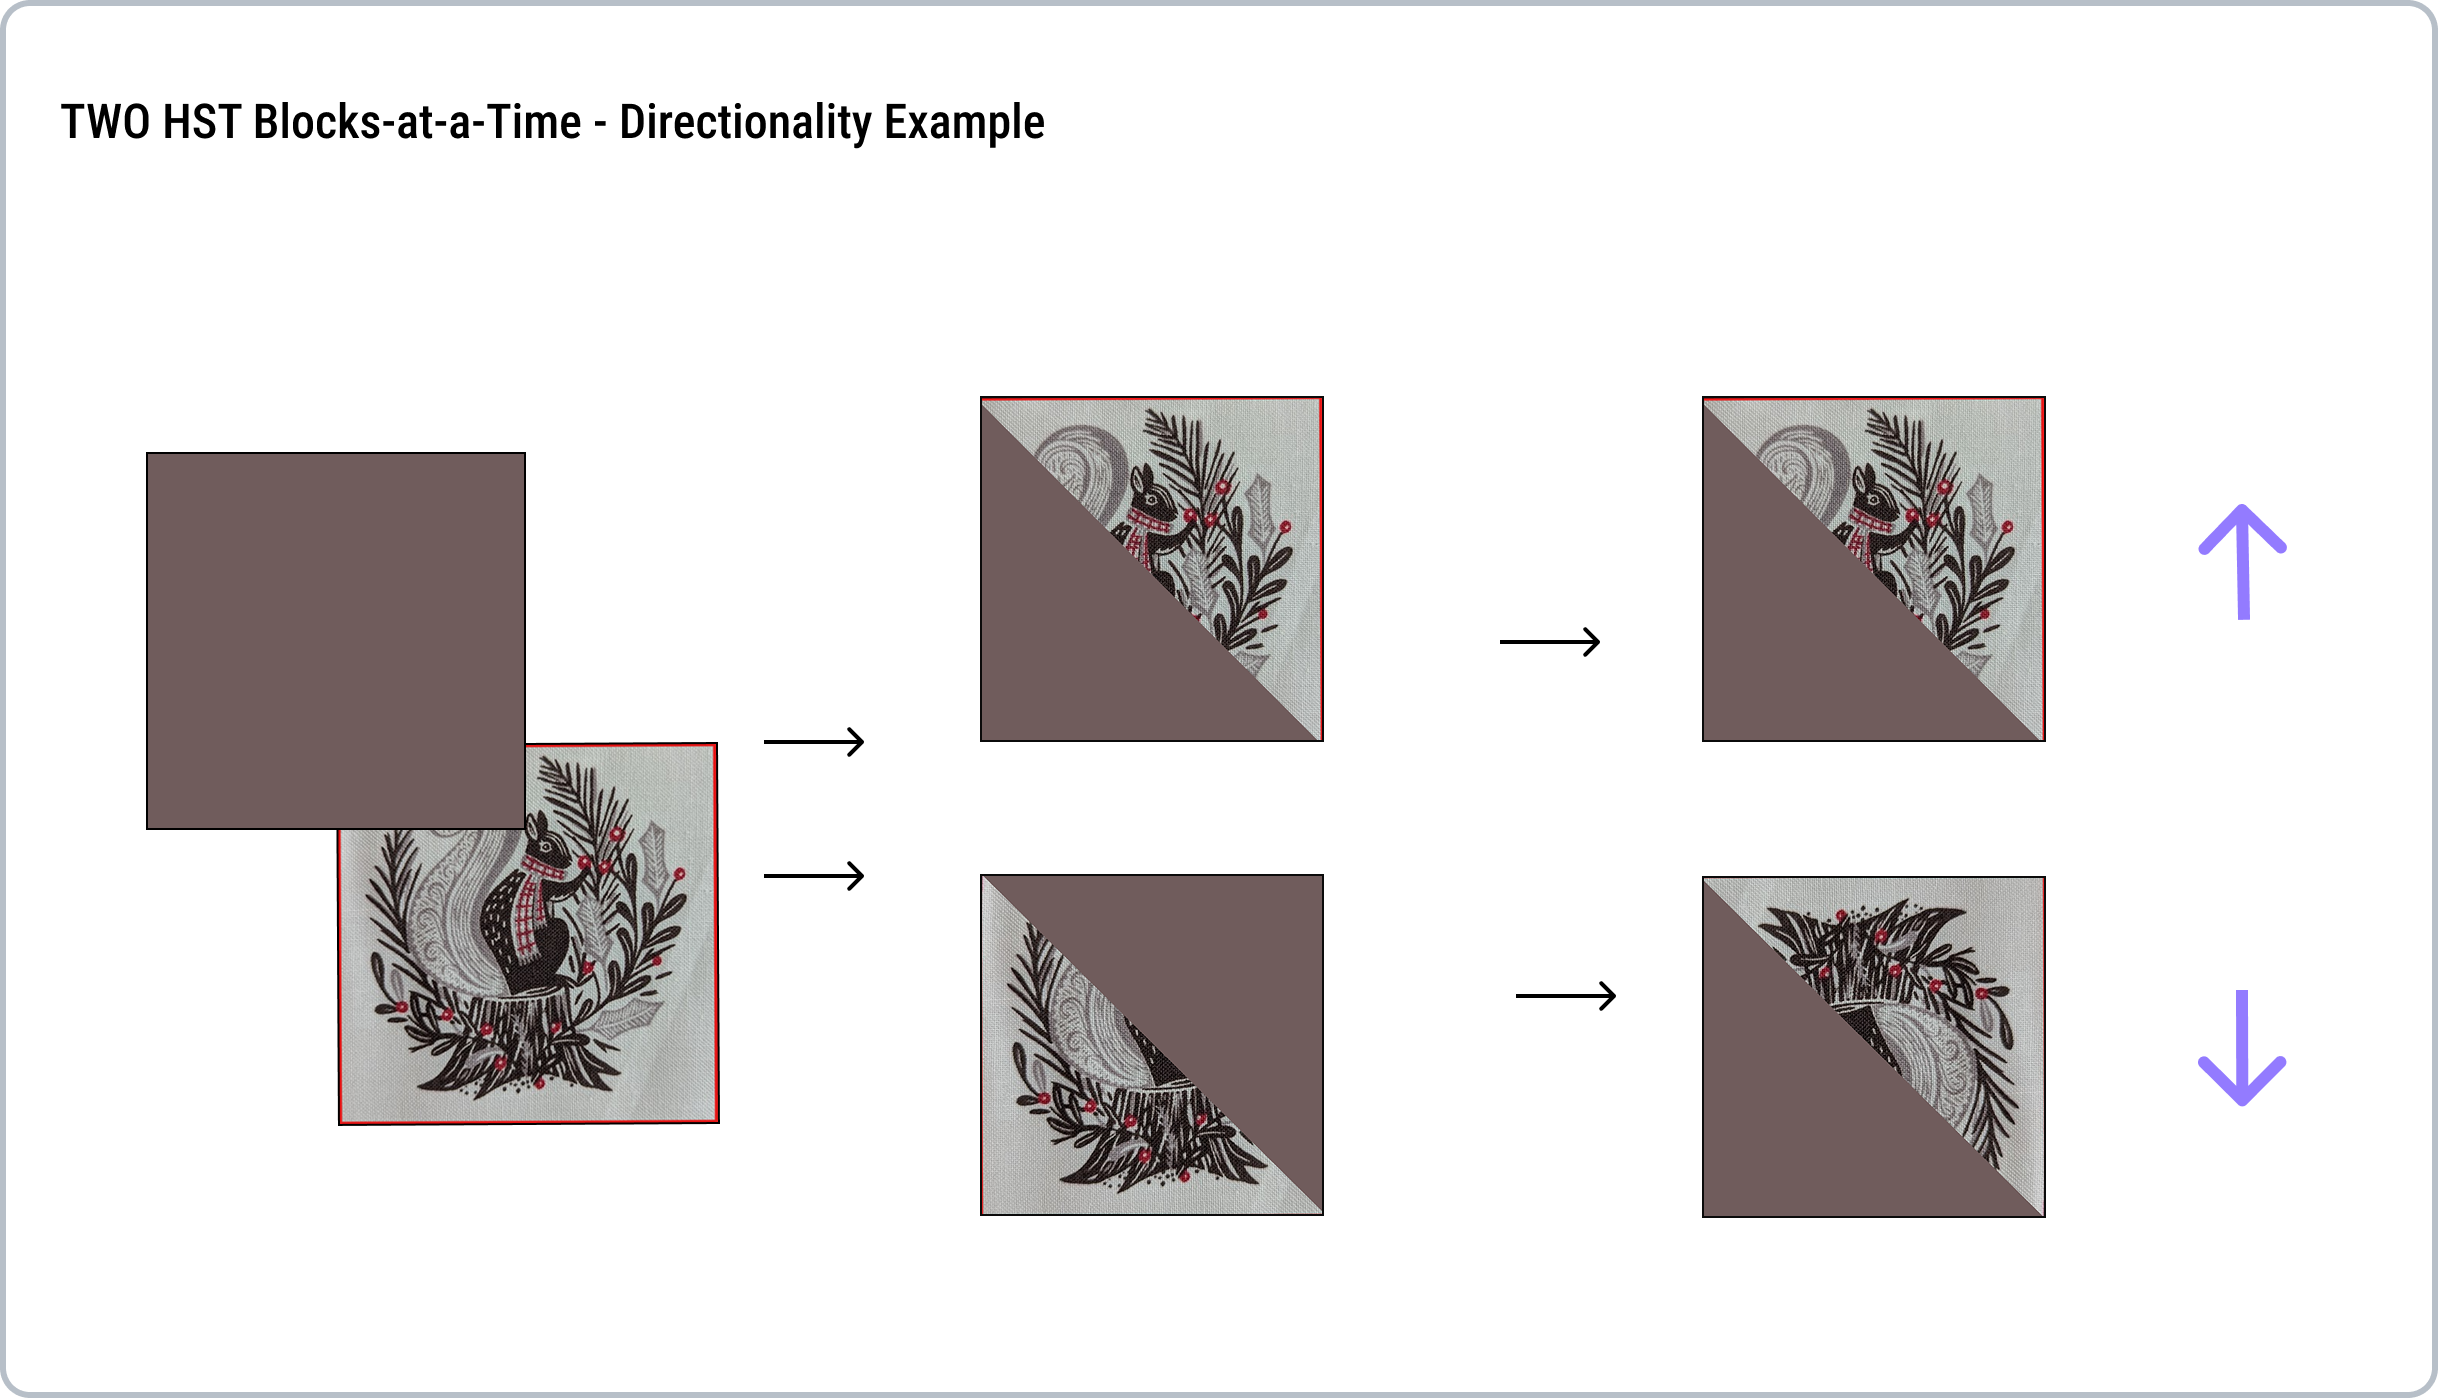
Choose this method when: “I want an accurate, low-waste default, and I’m happy to work with HSTs in pairs.”
Sizing shortcut: finished size + ⅞ in, with a scant seam allowance. Beginners can size up and square down after piecing.
4-at-a-Time HSTs: Fast, Fabric-Efficient — but Watch the Bias
The 4-at-a-time method is clever: sew two squares right sides together around all four outer edges, then cut on both diagonals. You get four HSTs from just two starting squares, with very little fabric waste.
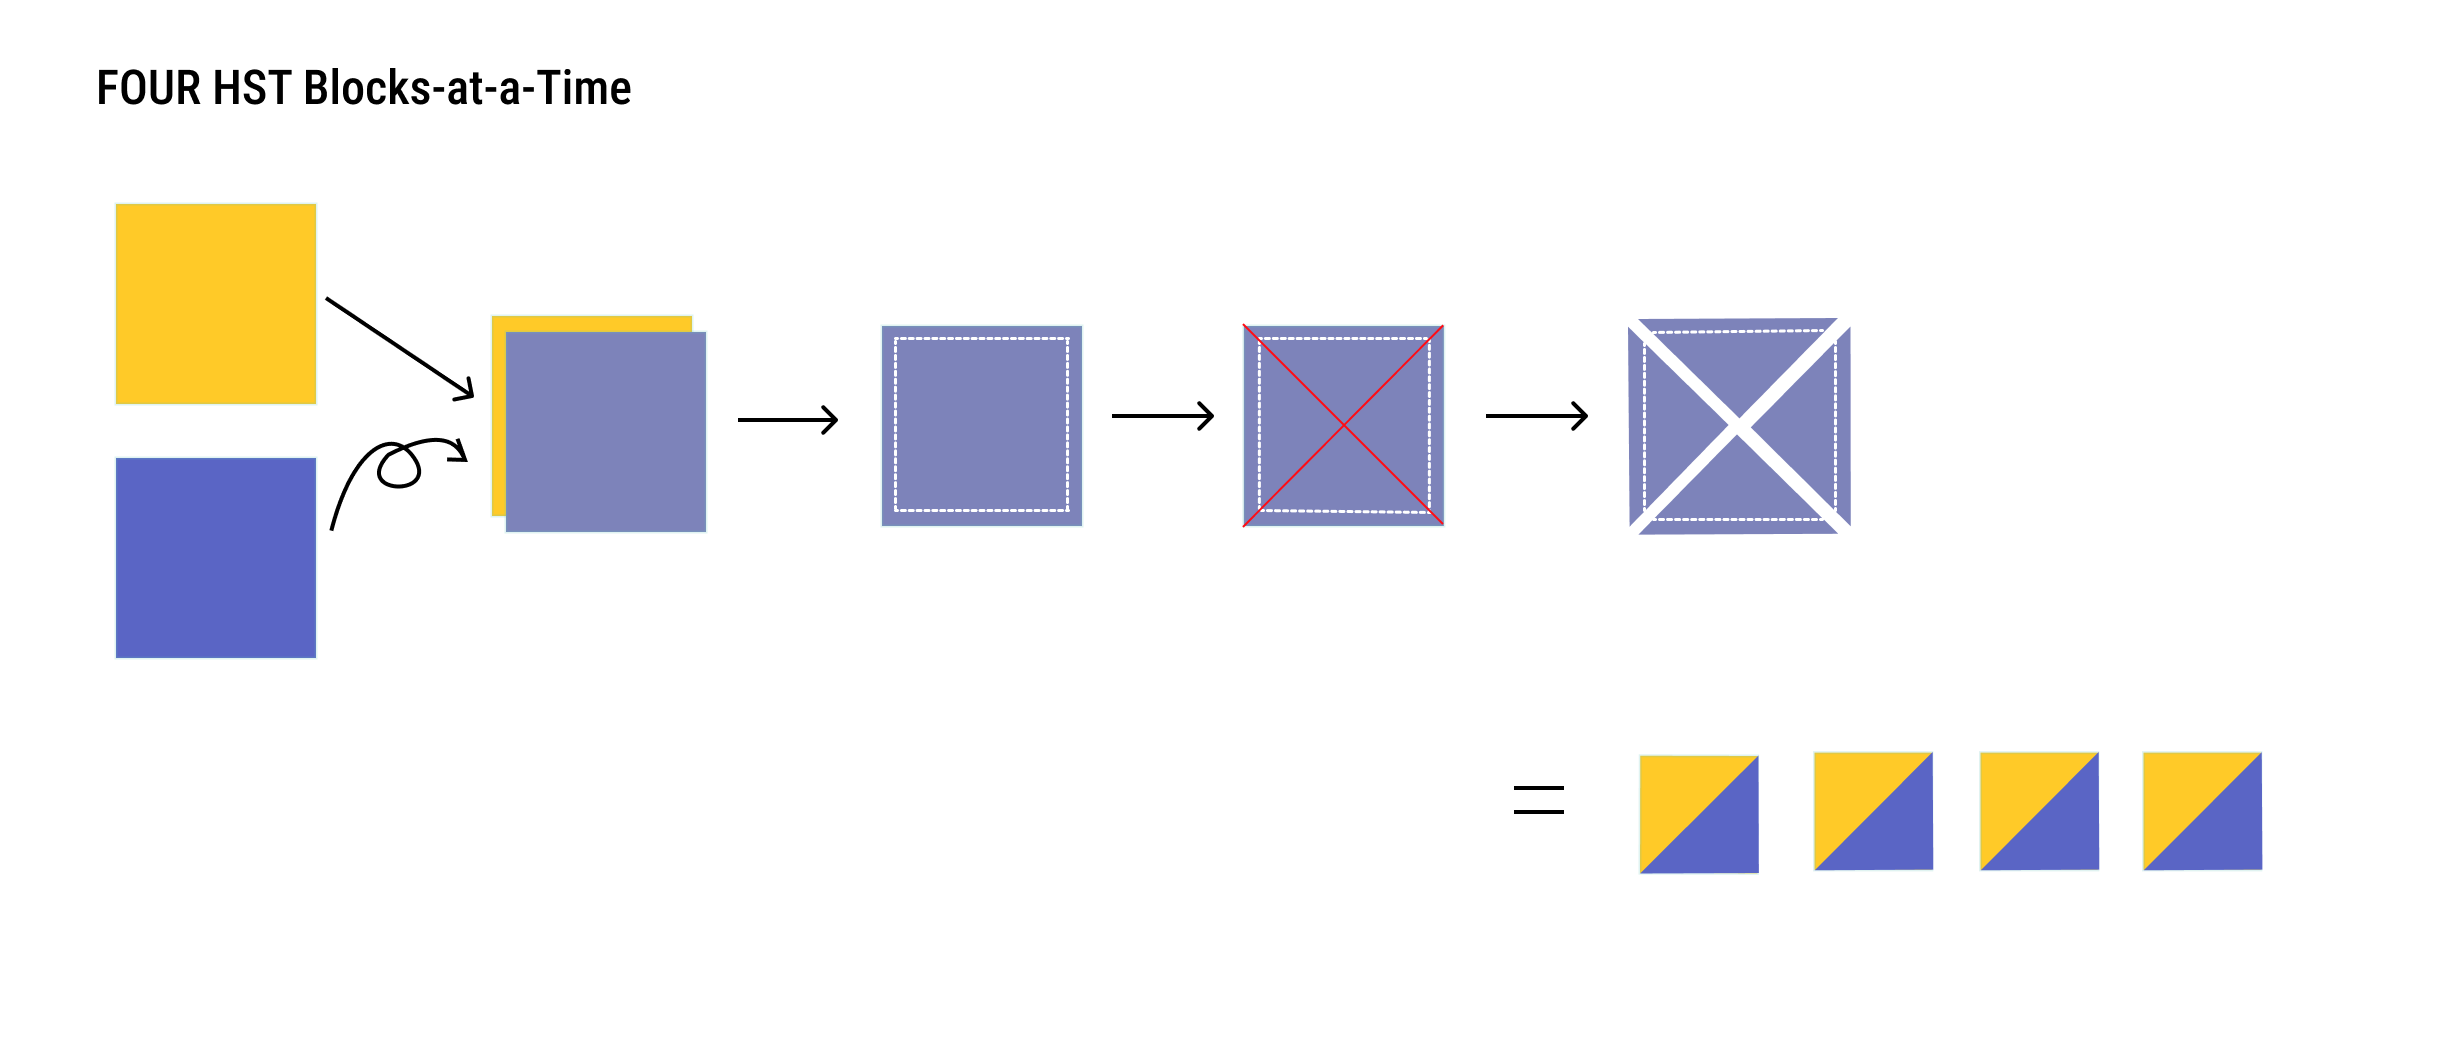
- 1Place fabric right sides together.
- 2Sew perimeter with a scant ¼ in seam allowance.
- 3Cut along the diagonal lines as shown above.
- 4Open and press.
This method has three real trade-offs. The outer edges of the finished HSTs are on the bias, so they can stretch out of square if pulled or ironed carelessly — handle them gently. Because the cut creates an outside edge of the square rather than separating two seams (as in the 2-at-a-time method), any cutting inaccuracy is unforgiving: it makes one triangle smaller and the other larger, with no seam to absorb the error. Larger starting squares also make it harder to keep the two layers flat while sewing the perimeter, and directional fabric is difficult to control since the pattern rotates 45° into each unit.
- Best for: four repeated HSTs from the same two fabrics, especially with non-directional prints or where rotation is acceptable.
- Fabric use: low waste.
- Bias edges: yes — the main reason this method needs extra care.
- Directionality: a one-way print rotates into diagonal orientations; the four HSTs point in different diagonal directions.
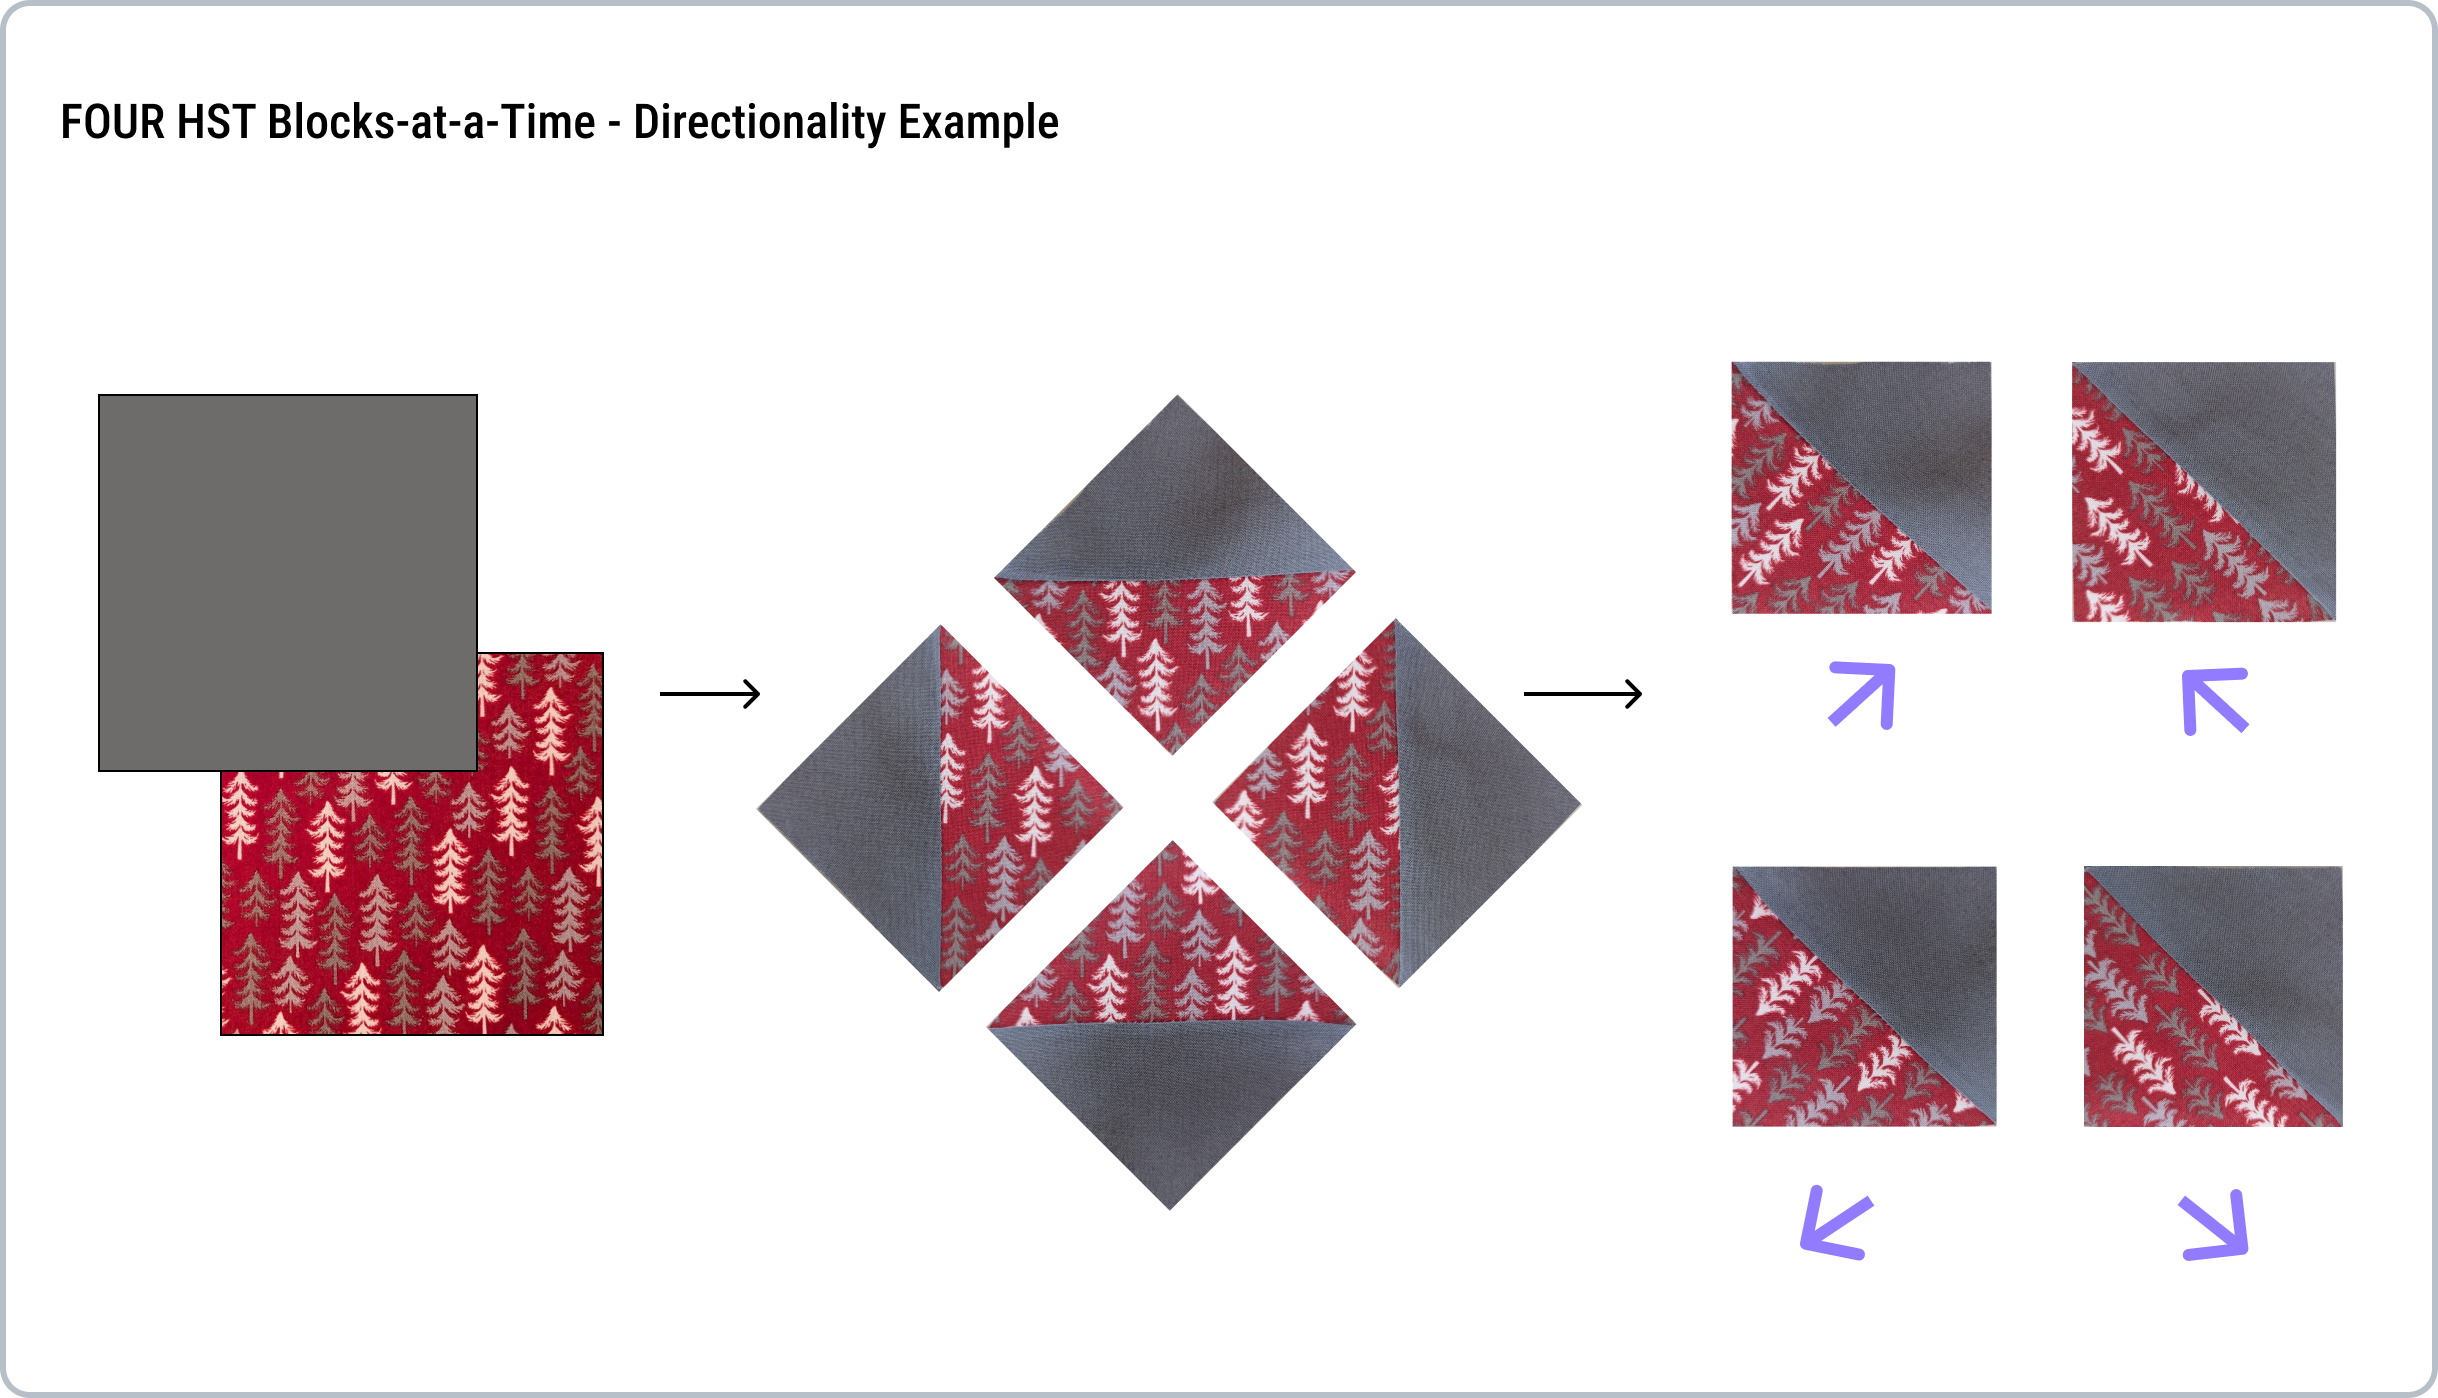
Choose this method when: “I need four of the same fabric pairing quickly, and I’m comfortable with the trade-offs.”
Sizing shortcut: unlike the other methods, the exact 4-at-a-time formula involves √2: starting square = (unfinished HST × √2) + ½ in. Use the chart above, or get exact measurements from PatchOwl quilt design software.
This formula combines a multiplication by √2 with a fixed addition — it isn’t a simple ratio. A simpler approximation (such as dividing by 0.64) will drift: it tends to make the starting square too small for smaller HSTs and too large for bigger ones.
8-at-a-Time HSTs: Fastest for a Batch, but Least Directional Control
When a quilt needs a pile of HSTs from the same two fabrics, 8-at-a-time can save a remarkable amount of repetitive sewing. Draw both diagonals to make an X, sew ¼ in on both sides of both lines, then make the horizontal, vertical and diagonal cuts shown below.
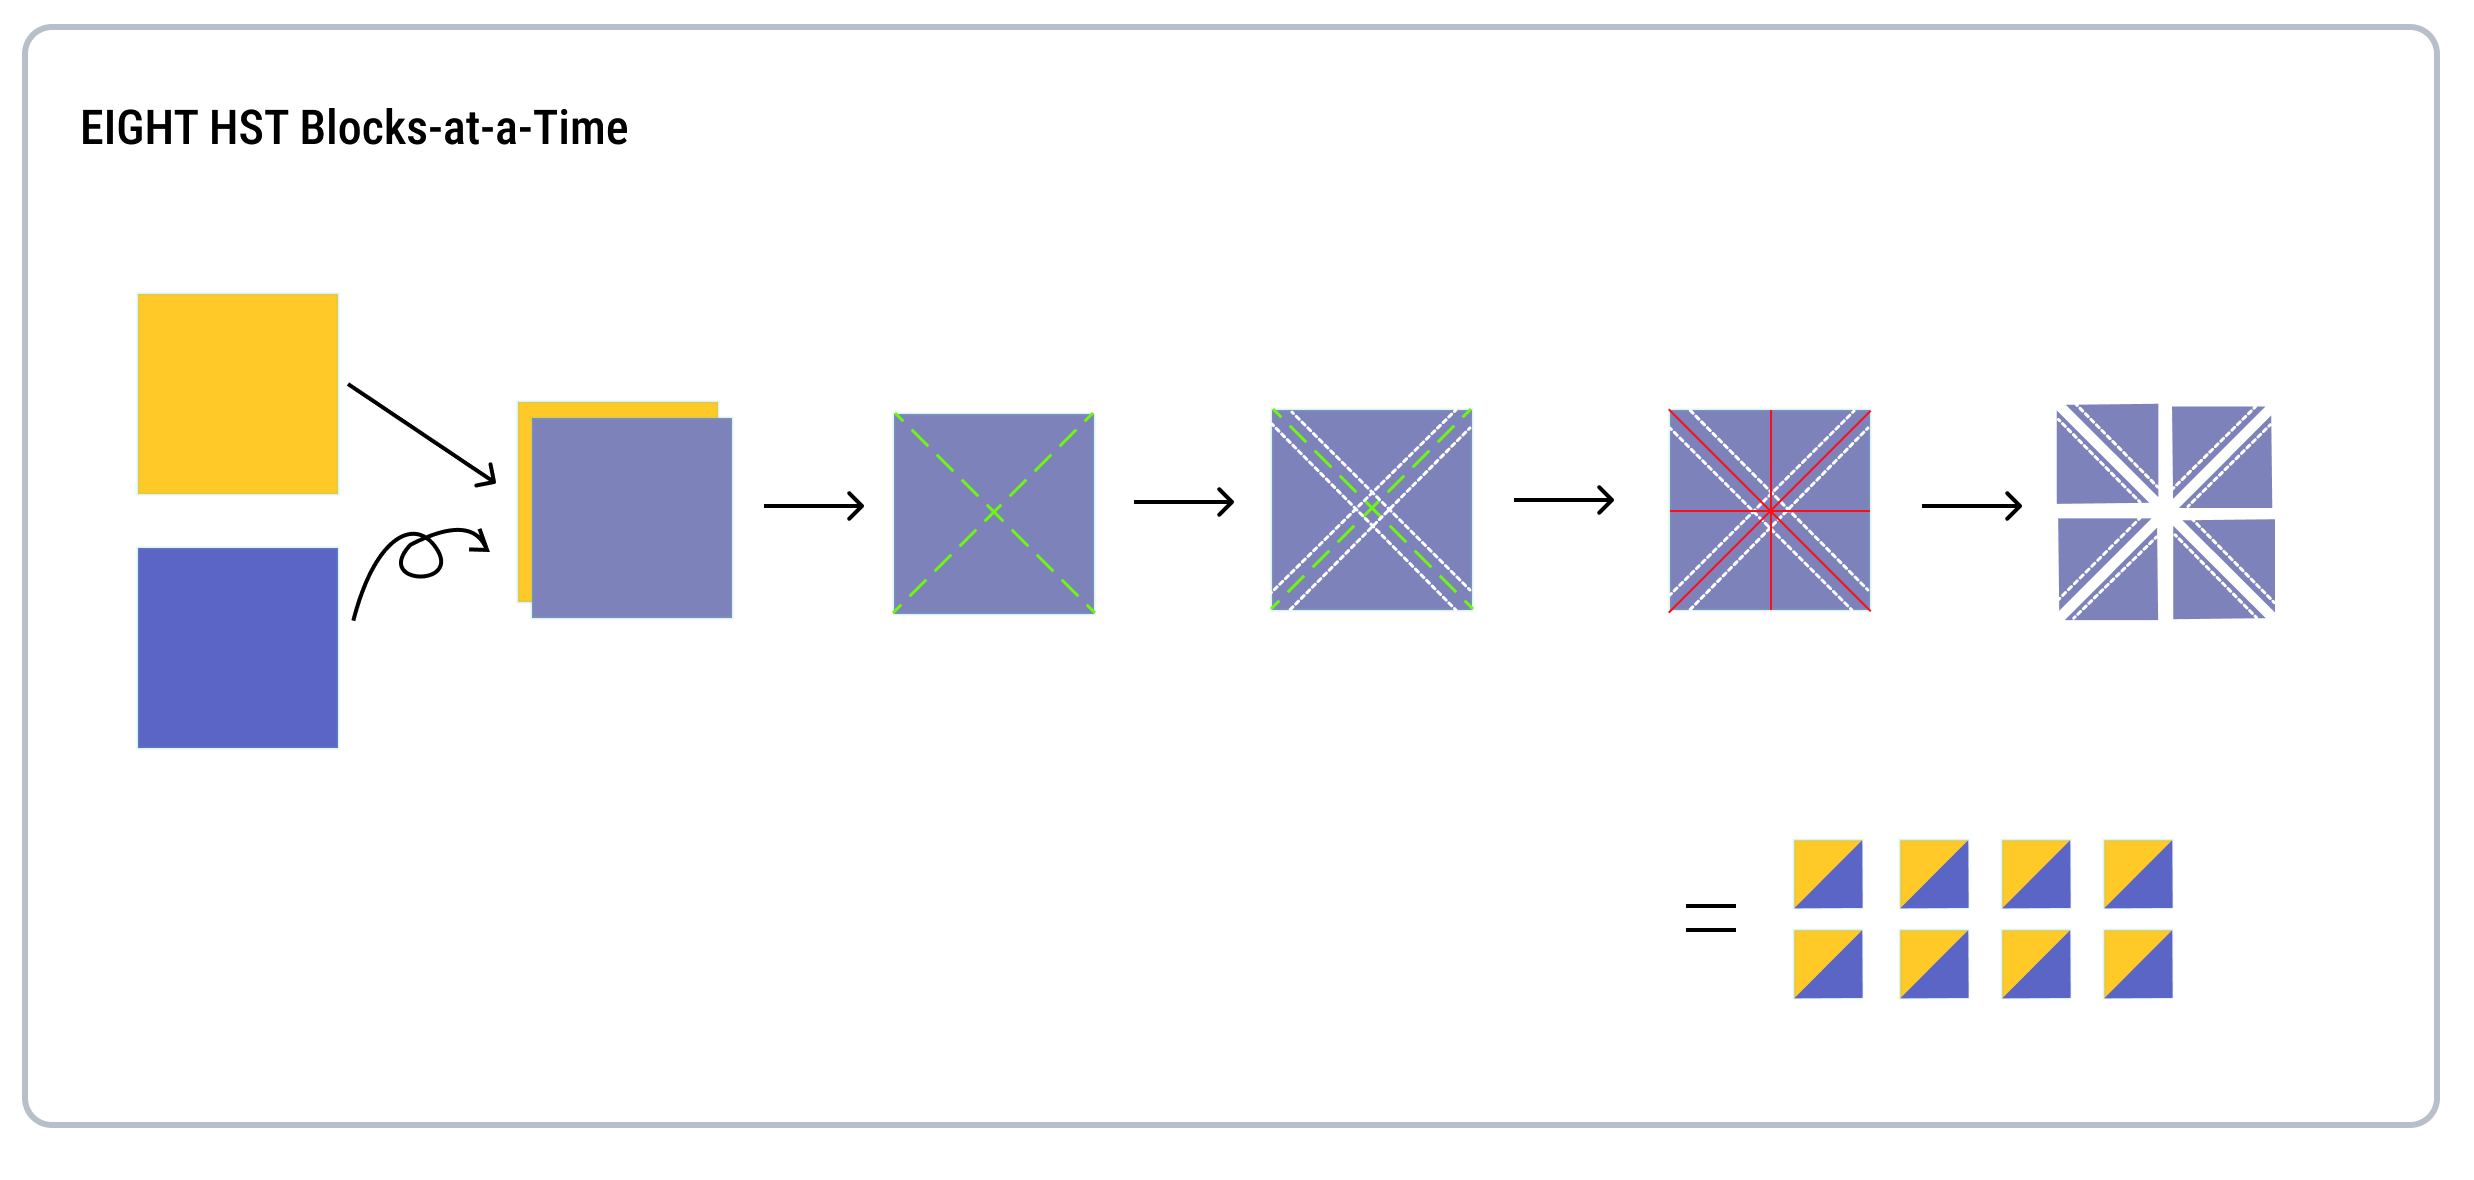
- 1Place fabric right sides together.
- 2Draw two diagonal lines, forming an X.
- 3Sew on either side of the line with a scant ¼ in seam allowance.
- 4Cut along the red lines as shown.
- 5Open and press.
- Best for: larger batches of the same fabric combination.
- Fabric use: low waste.
- Bias edges: none around the outside of the finished HST.
- Precision: the starting squares get large quickly, so a small marking, stitching or cutting error affects all eight units.
- Directionality: the eight units contain multiple print orientations — the directional motif appears in four orientations, rotated in 90° steps.
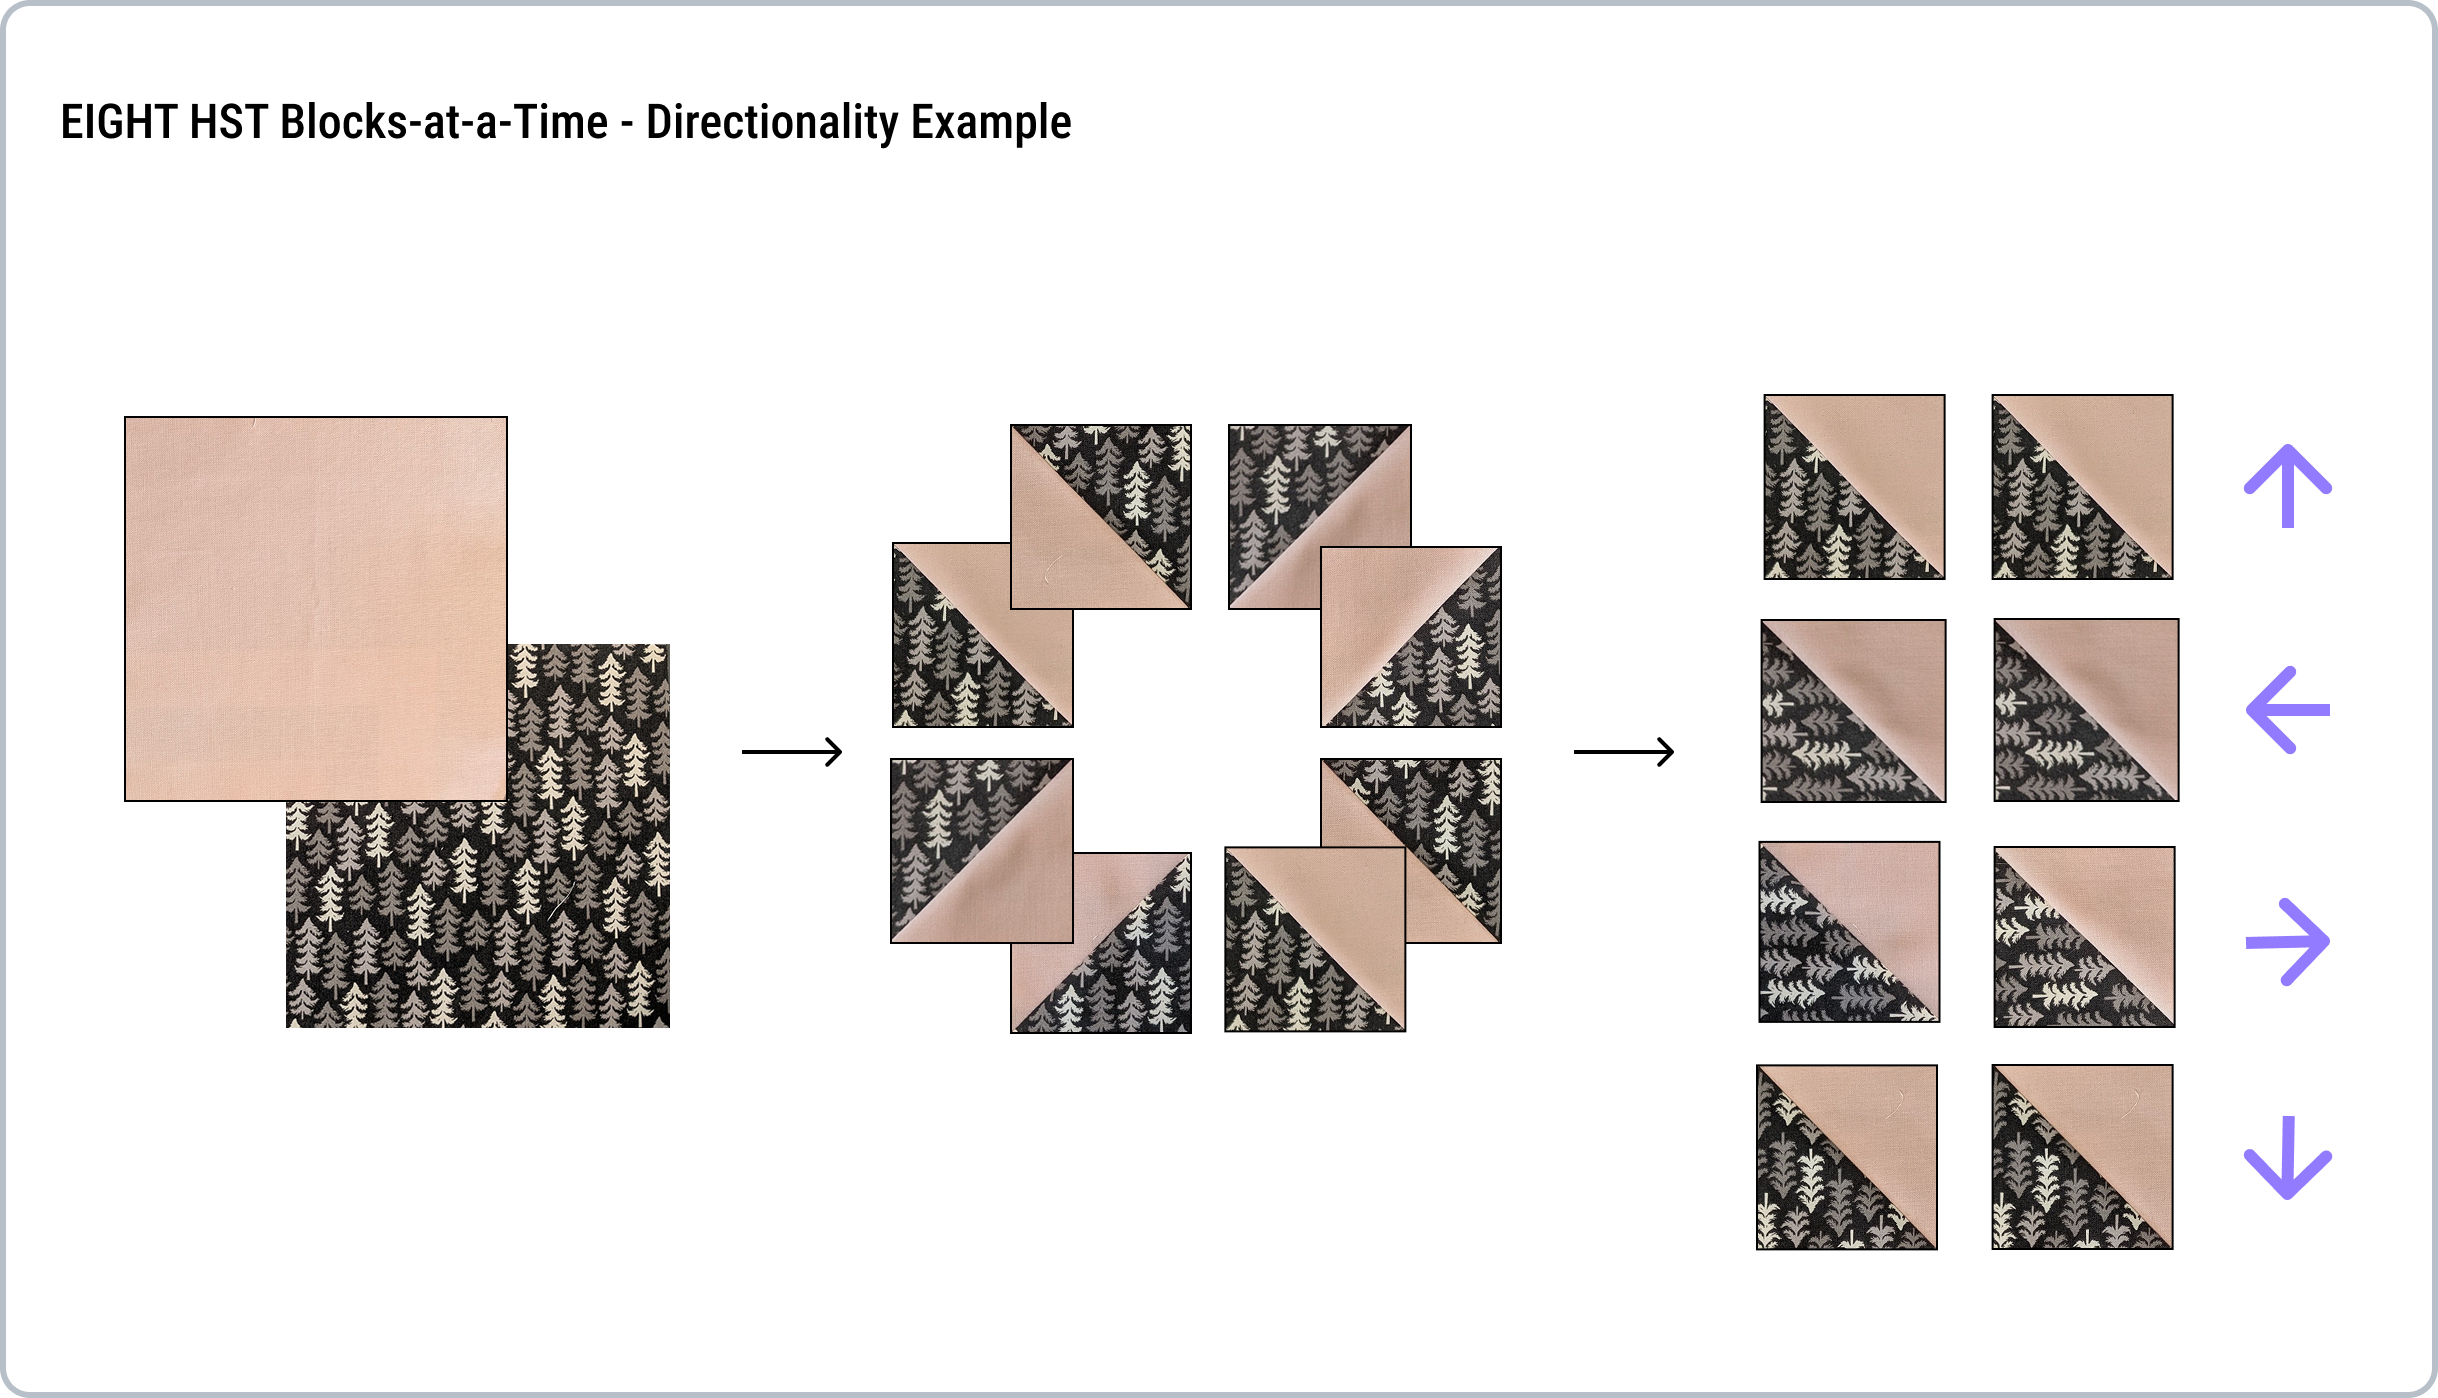
Choose this method when: “I need eight or more HSTs from the same pairing, and speed matters more than keeping every directional motif upright.”
Sizing shortcut: (finished size × 2) + 1¾ in.
Can You Use Directional Fabric for Half-Square Triangles?
Absolutely — but the construction method determines how much control you have over the final direction of the print. A tree, stripe, word, animal, arrow or border print can look perfectly upright on the starting square and rotate as the HST is cut and opened.
- 1-at-a-time: maximum control — use this when every motif must point a specific way.
- 2-at-a-time: paired units can point in opposite directions.
- 4-at-a-time: the print rotates into diagonal orientations.
- 8-at-a-time: the batch produces multiple orientations, typically 90° rotations, as shown above.
That rotation isn’t always a problem. In pinwheels, rings, stars and other rotational layouts, a directional print that changes orientation can become part of the design. What matters is knowing what your chosen method will produce before you cut.
So Which HST Method Should You Use?
Use this as a quick decision guide:
- Need one unit, fussy-cut placement or exact print direction? Use 1-at-a-time.
- Want the most dependable general-purpose method? Use 2-at-a-time.
- Need four matching HSTs quickly and can handle bias edges carefully? Use 4-at-a-time.
- Need a larger batch from the same two fabrics? Use 8-at-a-time.
- Need every directional motif upright? Favor 1-at-a-time — don’t pick a bulk method just because it’s faster.
- Using solids, blenders or non-directional prints? Choose primarily by quantity and how much trimming/handling you want to do.
How to Keep HSTs Accurate
Whichever method you choose, the same few habits make a noticeable difference:
- Use an accurate scant ¼ in seam. A seam that creeps wider can make HSTs finish too small.
- Mark long diagonals carefully. The bigger the starting square, the more a small marking error travels across the block.
- Press rather than slide the iron. This matters most for 4-at-a-time HSTs, since their outer edges are on the bias.
- Square up to the unfinished size. If you deliberately oversized your starting squares, trim each completed HST to finished size + ½ in before assembly.
- Make one test set first. Before chain-piecing dozens of units, confirm your seam allowance, pressing and trimming give the expected size.
Half-Square Triangle FAQ
What size squares should I cut for HSTs?
It depends on the construction method. Use the size chart above for the method you want to use, or design in quilt design software, like PatchOwl.
What is the difference between finished and unfinished HST size?
Finished size is what you see after the HST is sewn into the quilt. Unfinished size still includes the seam allowance and is ½ in larger — a 3 in finished HST should measure 3½ in before it’s sewn in.
Which HST method wastes the least fabric?
2-at-a-time, 4-at-a-time and 8-at-a-time are all relatively fabric-efficient. 1-at-a-time creates the most waste, since a second set of triangles gets trimmed away.
Which HST method is easiest to keep accurate?
For most quilters, 1-at-a-time and 2-at-a-time are easiest to control. 4-at-a-time has bias edges that can stretch, plus a few more risk factors. 8-at-a-time avoids exposed bias edges, but its larger starting square and multiple cuts mean accurate marking and trimming matter more.
Do 8-at-a-time HSTs have bias edges?
Not around the outside of the finished HST, using the standard Magic 8 construction shown here. 4-at-a-time is the method in this comparison that creates exposed bias outer edges.
Can I make HSTs from directional fabric?
Yes — just decide first whether the motif must stay upright. 1-at-a-time gives the greatest control; 2-at-a-time produces opposite orientations in a pair; 4-at-a-time and 8-at-a-time create multiple rotated orientations. Sometimes a change in direction is part of the design, and sometimes it isn’t — knowing which, ahead of time, saves a lot of headache.
What else do I need to know about directional fabric?
Factor directionality into your fabric yardage estimate. Non-directional shapes pack efficiently onto a roll of fabric; directional fabric needs more care. PatchOwl gives fabric yardage estimates and a cutting layout on a virtual fabric bolt for both directional and non-directional fabric, to help you plan enough.
Should I oversize HSTs and trim them?
It depends. If the HST is a final block in your quilt and you’re using 1- or 2-at-a-time, it’s usually not necessary. If you’re a beginner, unsure of your scant seam allowance, using 4- or 8-at-a-time, and/or the HSTs will be part of a larger unit (for example, a “Broken Dishes” block made from four HSTs), each error compounds — oversizing is worth the small amount of extra fabric. Trim right after the pre-assembly block is made, since your HSTs may sit next to a plain square and you’ll want standardized block sizes before sewing them together.
Why are my HSTs too small?
Common causes: starting squares cut too small, a seam allowance wider than intended, pressing that distorts the unit, or confusing finished size with unfinished size. Make a test set and measure before producing the full batch.
Let PatchOwl Choose the Right Method for You
PatchOwl makes HST construction recommendations, while leaving the choice up to you. Skip the math, keep sewing.
Get Started